

WUTA LEATHER SKILLS: EDGE FINISHING TUTORIAL
Achieving clean, polished edges is crucial for elevating the overall appearance and professionalism of your leather projects. To help you master this essential leatherworking skill, we've meticulously outlined the step-by-step process in meticulous detail!
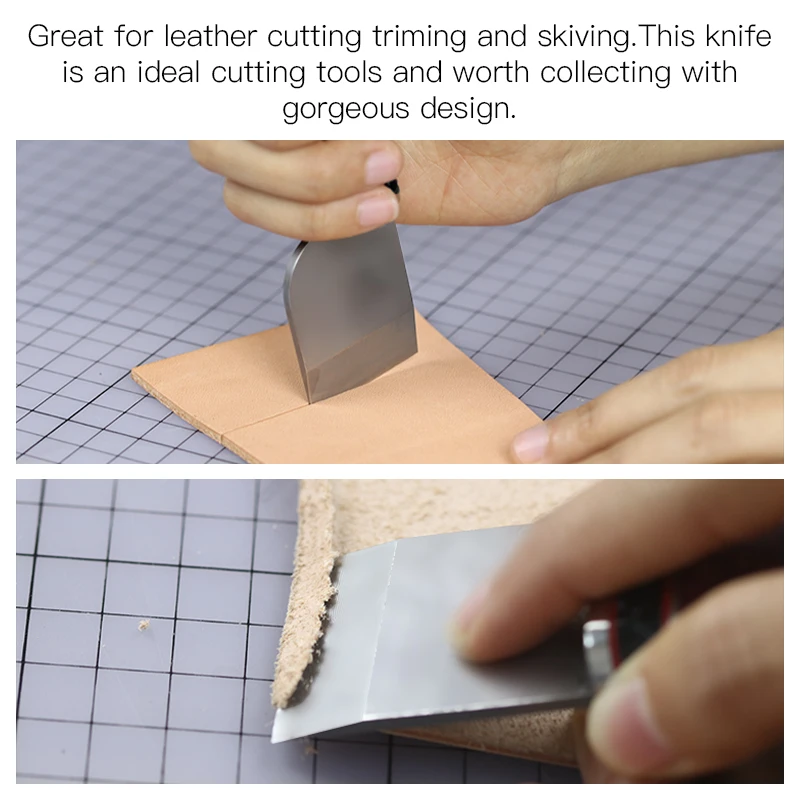
Step 1: Edge Trimming
The initial trim is critical when creating a finished edge, as it greatly reduces the amount of work required for subsequent sanding. It is important to take care to angle the blade slightly outward so that only the lining is trimmed without affecting the surface of the project. At the same time, wipe the blade regularly to ensure it maintains its sharpness for more detailed and professional results.

Step 2:Finish Leather Edges
One of the final critical steps in creating high-quality, professional-looking leather goods is deciding how to treat the edges of your project. Once you've mastered the basics, you'll have ample freedom to personalize as you go. Each leather artisan develops unique tastes and preferences and seeks the best products and edge finishing techniques. Here, we'll cover three of the most common edge treatments for leather goods to give you more inspiration and options.
1.sand
Regardless of how you proceed with finishing your edges, the first step will always be to sand the edges. Especially where multiple pieces have been glued together, sanding ensures a straight, flush and smooth edge. This step will also remove any excess glue that may have seeped over, which could potentially ruin your edge finish. Working from a low to high grit when sanding is the key to a mirror-like shine; when in doubt, sand more.
2.Bevel Grinding

Beveling is a crucial finishing step, especially during the polishing phase. By removing the 90-degree angle from the edges, the leather edges will take on a more rounded appearance, resulting in a more professional finish.
After the edges are sanded flat and squared, we need to use a bevel machine to sand along the edges. These tools are available in a variety of sizes, choose a suitable size that corresponds to about 25% of the thickness of the leather. We are going to bevel the grain and flesh side of the leather for the best polish. This step is critical as it ensures that the leather does not mushroom or fold when buffing, thus guaranteeing a flawless finish to the final product.
3.Choose Burnish, Stained or Painted?
There are three main methods to choose from when it comes to finishing leather edges, including buffing only, staining, and buffing and painting. Each method effectively seals and protects the leather edges and gives your piece a professional look. Choosing the method that is best for your project depends on the type of leather, its use, and personal preference. You can decide which material to use for the edge according to the actual situation and the desired effect, so as to ensure that the final product achieves the effect you expect.
The role of Burnishing
Burnishing is the easiest way to finish the edge and works best with veg tan leather. It seals the raw cut edges and creates a waterproof barrier. Since no pigments are added to the leather, the burnish brings out the natural color of the leather. Polishing does darken the edges a bit and leaves a smooth finish.
To burnish, apply water, wax, or tragacanth to the edges of the leather. Rub the buffing tool vigorously back and forth with just the right amount of pressure; you need to generate heat to allow the wax or gum to penetrate the leather fibers. This compresses the leather fibers and seals the edges to keep moisture out. Allow the leather to dry and cure naturally. For extra shine, buff the edges with a piece of canvas buff.
Why Choose Edge Paint?
Edge paint is an excellent option for certain types of leather that may not burnish well, such as thin, supple, and pliable leathers like chrome-tanned, bonded, or exotic leathers. Even vegetable-tanned leather can benefit from edge painting. With a wide range of colors available, you can select edge paint that complements or contrasts with your leather project's overall finish.
Unlike dye, which penetrates the leather fibers, edge paint sits on top of the edge, creating a smooth and even surface. It's especially helpful in filling gaps and leveling uneven edges, resulting in a polished and refined appearance.
The advantage of using edge paint is that you don't need to bevel the leather beforehand for finishing purposes. However, if you prefer the look of beveled edges, keep in mind that applying paint over beveled edges can be more challenging to achieve a clean and precise application.
To achieve a smooth edge with edge paint, you will need to apply multiple layers. Start by sanding your leather project to ensure a smooth surface. If desired, bevel the edges. Apply the first thin coat of edge paint using a brush, roller applicator, or an awl, ensuring it starts filling the leather fibers. Allow the paint to dry or use tools like a heat gun, hair dryer, or electric edge creaser to speed up the curing process. Once dry, sand the edge smooth and add another layer of paint. Continue alternating between sanding, painting, and curing until you achieve a consistent and smooth coating. Let the edge dry naturally.
To finish the process, apply beeswax to the edge and buff it with a canvas cloth or consider adding a sealant for extra protection against water and abrasion.
Why Opt for Dye?
Using dye to finish leather edges offers several advantages over other methods, such as edge paint. Dyes deeply penetrate the leather fibers, resulting in a more thorough and long-lasting color. Unlike edge paint that sits on the surface and may wear off over time, dyes provide a more natural and seamless appearance. They are available in a wide range of natural or neutral shades, making it easy to find the perfect color to complement your leather project.
One of the key benefits of using dye is its versatility. It can be applied not only to the raw edge but also to the surface of the leather, allowing for consistent color throughout the project. However, because dye alone doesn't create a protective seal, burnishing is necessary after dyeing to achieve a professional and durable finish.
To prepare the leather for dyeing, start by sanding the edge until it's smooth and then bevel it for a polished look. Use a leather burnisher to lightly seal the edge and remove any lint. Next, apply the dye with smooth and even motions, using a brush, dye pen, or wool dauber. Applying multiple coats will help achieve your desired color intensity. Keep in mind that burnishing the edge afterward may slightly darken the color, so plan accordingly.
After the dye has fully dried, employ your preferred burnishing technique to achieve a smooth and glossy finish. This two-step process ensures consistent color saturation and a properly sealed edge.
I hope this was helpful and if you have any questions about the smooth leather edge or would like us to answer any of your questions in a future post please email us and we will do our best to resolve it. Thank you so much
If you get a chance, please send us some photos of your work!