

What is drumming process in leather?
Leather drumming process has always been a big hit in the handmade world. As the object of both the gods and novices, it naturally has its advantages: the drummed leather seems to be more layered, and because of the complex process, it also has a higher value.

The core of drumming is to form a height difference, two methods are commonly used.
1:Thick skin edge shovel thin, skin edge thinning is a "high-end" skills.
2:The center of the stuffing pad thick, that is, add lining to make the middle convex out to achieve the purpose of drumming.
Today to make a bracelet as an example, first to show you a edge thinning drum operation.

After doing the drumming, the bracelet is obviously fuller and has a sense of dimension. Next is the detailed production process.

Scribe on the leather surface to make the length and width of the hand belt, specifications reference length 17.5CM - paragraph 1.95cm (even size).

Dye the leather at the location where the specifications are drawn, in the color of your preference.

Use 20mm punch half-round cutter for chopping the tail.

Cutting with a skinning cutting knife

Draw a 5mm margin mark on the back of the part for the required thinning

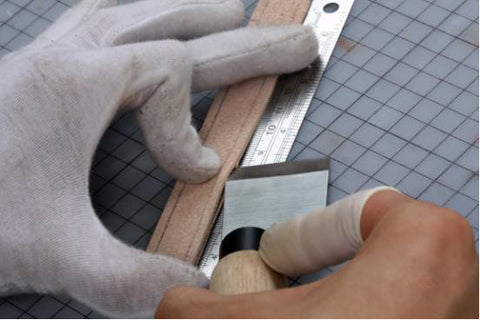
Use a 1mm thickness ruler to pad out the 1mm error for thinning, provided that you ensure that the cutter is polished sharp.

Carefully cut along the scribed margin mark and make sure not to penetrate the whole, otherwise it will fail.

The back side after thinning is shown, continue to the next step.

Since the glue dries quickly, skip the step of fitting the body to the attachment and use a OX Bone Folders to press firmly and shape the thinned edges.

Use 3.0mm pricking iron chop for perforation.

The border line maker is adjusted to 2.0mm spacing to draw a border line to enhance the sense of three-dimensional. This point is also useful.

Stitching.

Rounding off the edges.

Dyeing of the edges. Select the dye according to the color of the band body.

Top sealing liquid.

Wait for the edge sealant to dry before edge polished.

Make a suitable aperture


Install the S copper hook mouth, and the bracelet is completed.